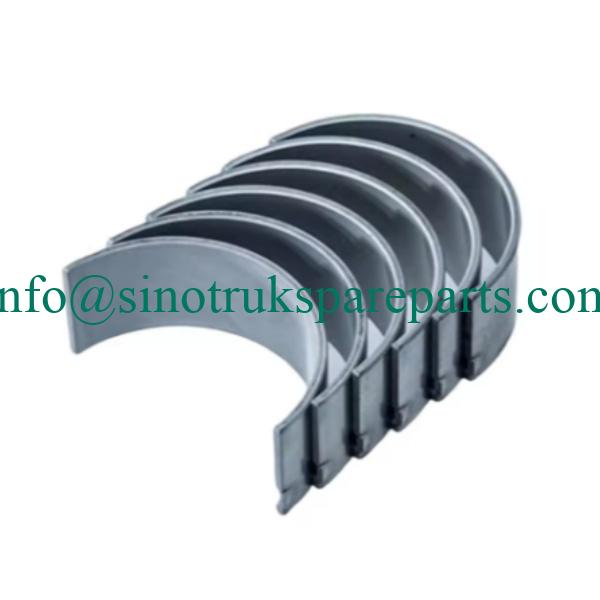
Genuine Sinotruk HOWO 081V02410-0693 Lower Connecting Rod Bush
This authentic Sinotruk HOWO lower connecting rod bush (No de pièce: 081V02410-0693) is manufactured to exact OEM specifications, ensuring optimal engine performance and longevity. Designed specifically for heavy-duty applications in HOWO truck engines, this precision component provides the critical connection between the connecting rod and crankshaft, maintaining proper alignment and reducing wear under extreme operating conditions. The bronze alloy construction with special surface treatment ensures excellent load-bearing capacity and durability, making it an essential replacement part for engine rebuilds and maintenance.
Spécifications techniques:
Matériel: High-grade bronze alloy (CuSn8P) with steel backing
Diamètre intérieur: 85.0 ± 0.01 mm
Diamètre extérieur: 92.5 ± 0.01 mm
Largeur: 38.5 ± 0.1 mm
Wall Thickness: 3.75 mm uniform
Finition de surface: Precision honed (Ra ≤ 0.2 μm)
Capacité de chargement: 45 MPa continuous, 90 MPa peak
Résistance à la température: -40°C to +180°C continuous operation
Compatibilité:Howo A7, Série T7H avec des moteurs Weichai WP10 / WP12
Norme de fabrication:ISO 9001 agréé, OEM specifications
1. NOUS TRAITONS CHAQUE CLIENT COMME NOTRE AMI, ADHÉREZ AU PRINCIPE: AVANTAGE GAGNANT ET MUTUEL ;
2. UNE VARIÉTÉ DE CHOIX DE PRODUITS: QUALITÉ, MARQUE, EMBALLAGE;
3. NOUS VOUS RÉPONDRE À VOTRE DEMANDE EN 24 HEURES.
4.Fournisseur de pièces SINOTRUCK de performance professionnelle
5. NOUS SERONS EN SERVICE 24/24 HEURES DE LA JOURNÉE DE TRAVAIL.
6. CUL: NOUS VOUS OFFRIRONS LE MEILLEUR SERVICE APRÈS-VENTE.

Installation Guidelines for 081V02410-0693 Lower Connecting Rod Bush:
Liste de contrôle de pré-installation:
1.Component Inspection:Vérifiez le numéro de pièce (081V02410-0693) matches OEM requirements
2.Measurement Check: Measure crankspin diameter and connecting rod bore for proper clearance
3.Cleanliness: Ensure all components are perfectly clean and free from debris
4.Tool Preparation: Have proper bushing driver set, torque wrench, and measuring tools ready
Étapes d'installation:
1.Old Bush Removal: Use proper bushing removal tool to extract old bush without damaging connecting rod
2.Bore Cleaning: Thoroughly clean connecting rod bore using appropriate solvent and lint-free cloth
3.New Bush Installation: Align new bush with oil holes and drive into place using proper mandrel
4.Size Verification: Check inner diameter after installation and hone if necessary to achieve proper clearance
5.Vérification de dédouanement: Verify oil clearance (0.04-0.08 mm) using plastigage or precision micrometers
6.Lubrication: Apply clean engine oil to bush surface before final assembly
Critical Warning:
Never reuse old connecting rod bushes - always replace with new ones
Avoid hammering bush directly - use proper installation tools
Verify oil hole alignment before final installation
Check bearing clearance to manufacturer's specifications
Spécifications de couple:
Connecting rod bolts: 120 ± 5 Nm + 90° angular turn
Ensure proper torque sequence and use calibrated torque wrench
Post-installation:
Système d'huile de premier ordre avant le démarrage initial
Run engine at idle and check for unusual noises
Monitor oil pressure during initial operation
Change engine oil after first 50 hours of operation